CLI Overview
Headless Accelerator (HA) CLI is a Command Line Interface (CLI) tool to speed up the implementation of headless projects with Magnolia.
With HA CLI, you can bootstrap a new project with a pre-generated skeleton application. You can easily create new Components, Content Apps, and Page templates. HA CLI gives you an overview of the running Magnolia instance and web application.
Refer to the Installation section of this documentation to ensure your system is ready to use HA CLI.
In this part of the documentation, we are going to look at:
- The folder structure of the bootstrapped project
- Usage of the HA CLI commands
- HA CLI dev console
- Environment variables
- Magnolia variables
- Build
- Dev info
- Storybook
- Update
- Git ignoring files
- Troubleshooting
Folder structure#
After creating a new React project using HA CLI, the root directory has a following folder structure:
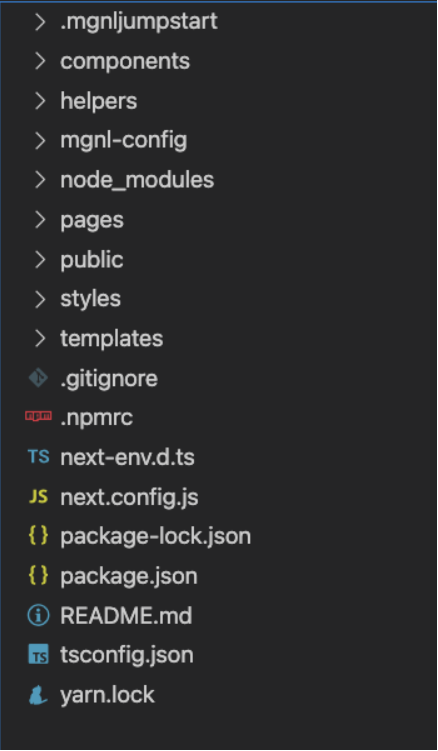
Let's go over some important files and folders:
Magnolia Webapp#
.mgnljumpstart/
By default, you will find a folder called .mgnljumpstart/ at the root of the project. This folder contains the Magnolia webapp, as well as the Magnolia light modules folder.
There is no need to modify the .mgnljumpstart/ folder manually at any point, as it will be automatically updated during the development process.
Components#
components/
The components/ folder contains all the generated components and the Headline component.
Generating a component using HA CLI creates a new folder in the components/ directory. This subfolder has the same name as the component itself and contains all the code associated with the component. Refer to Create a new component for generating a new component.
note
You can create a new component manually as well.
Create a new folder for each component and all the code associated with it.
Created component folder contains five files by default:
- index.js - exports the component
- ComponentName.model.ts - contains data model for the component. The file is automatically created and updated from the yaml file.
- ComponentName.stories.ts - contains component storybook UI template to make use of the Storybook
- ComponentName.tsx - contains code associated with rendering the component
- ComponentName.yaml - contains dialog and template definition - defines what properties are available for the component and if the dialog should be created
Content Apps#
mgnl-apps/
Generating a content app with HA CLI creates a new folder mgnl-apps and the subfolder with the content app itself. The app folder contains two files:
- index.js - contains the representation of the app's data structure and some query methods for managing stored items. Saving the model.yaml file automatically updates it
- model.yaml - contains the content app's data structure (content type model definition)
Refer to Create a new App for generating a new Magnolia Content app.
Magnolia Config#
mgnl-config/
You can modify your Magnolia light module in the mgnl-config/ folder.
Important
To edit the definition of a specific component, modify the yaml file in the corresponding component subfolder in the components folder.
The same applies for editing pages and content apps definitions.
By default, you can find here these subfolders:
- decorations - contains Definition decoration files
- restEndpoints - contains REST endpoint definitions, see Delivery endpoint in Magnolia docs for more information
- themes - contains Theme definitions for the entire site
- virtualUriMappings - contains Virtual URI mappings definitions to redirect an incoming request to the actual location of the content
Refer to Light development in Magnolia for available light development features.
Pages#
pages/
The pages/ folder contains the render functionality for the main page.
Templates#
templates/
The templates/ folder contains definitions of all the page templates in the web application. When you generate a new page template, a new subfolder is created in the templates/.
Refer to Generate a new Page Template to create a custom Page template.
Magnolia Config Specification and Mappings#
magnolia.config.js
mapping.json
The magnolia.config.js file is a core configuration file. Both magnolia.config.js file and mapping.json file help to link front-end components to their Magnolia counterparts.
note
Do not change these files manually.
magnolia.config.js file and mapping.json file are automatically updated when you generate or edit component/page.
Package Specification#
package.json
The package.json file contains all the essential information for the project and Magnolia configurations.
The root property allows you to modify the root of the project's source code.
note
The default value of the root property is "./src".
The magnolia property allows you to configure the magnolia Site settings, similar to how you would in the Magnolia Site App.
Ignore Files#
.haignore
If no .haignore file is provided in root directory, .gitignore will be used to filter out files that don't match.
.haignore is following the gitignore spec: http://git-scm.com/docs/gitignore
Make sure .mgnljumpstart is in your ignore file. If you have a build script and point the light modules underneath the frontend code e.g. mgnl-lm-build or mgnl-lm-dist make sure you add this into the ignore file
How to use HA CLI commands#
With Magnolia HA CLI you can easily jumpstart your application, as well as generate new components, apps, and page templates. Let's go through the HA CLI commands that are available for you.
ha <command>
Commands:  ha dev                  start dev instances  ha generate <type>      Generate new components or pages  ha install [options]    Install Components to Magnolia  ha jumpstart [options]  Jumpstart Magnolia Headless Projects
Options: --version Show version number [boolean] --help Show help [boolean]ha jumpstart#
This command jumpstarts the new headless project with a Magnolia instance and a project template of your choice.
You can choose from available project templates. As of February 2022, there are these starter templates available for you:
- react/salesforce-magnolia - Magnolia and Salesforce Commerce Cloud (SFCC) integration
- react/next.js - React framework support
- angular/angular-ssr - Angular framework support
- vue/nuxt.js - vue framework support
Headless Accelerator CLI downloads and installs Magnolia and creates an application from the template.
Once the installation is successful, you can see newly created files and folders in the project root directory.
Directory for Magnolia-related files#
During the jumpstart process, you can specify a directory within your project for generating the Magnolia-related files (not available in the SFCC project template). By default, these files are generated in the root directory.
The directory for Magnolia-related files is stored in the generatedFiles property of the magnolia variable.
ha dev#
This command opens the HA CLI dev console and starts up the Magnolia instance and web application.
Following is executed during ha dev:
npx --yes @magnolia/cli@4 start- starts up Magnolia AdminCentral on port 8080yarn dev- starts up web app of the chosen framework port 3000.ha install -w- installs available components to the Magnolia instance
The HA CLI dev console provides an overview of the running Magnolia instance and the web application. Check this preview when something isn't working as expected.
While running ha dev, you can evoke some actions by pressing these keys:
c- to show a dialog (terminal application) for generating a component, content app, or page templater- to executeha installmanually to create necessary files and code in your Magnolia Light Moduless- to start up Magnolia HA Storybook and preview your componentscontrol + k- to clear the HA CLI preview screenqorcontrol + c- to quit HA CLI
ha install#
Executing this command would install components into the local Magnolia instance. It generates necessary files and code in the Magnolia Light Module after creating a new component or modifying the mgnl-config folder. There is no need to run this command, as it is executed in watch mode while ha dev is running.
ha generate <type>#
componentThis command generates a new component. HA CLI creates a new subfolder in the components/ folder for each generated component. The subfolder contains all the definitions and the code associated with the component. Read how to create a new component.
appRun this command to generate a new Magnolia content app. HA CLI creates a new subfolder in the mgnl-apps/ folder for each generated content app. The subfolder contains the content type model definition for the app. Read how to create a new app.
pageThis command creates a new custom page template for your pages. HA CLI creates a new subfolder in the templates/pages/ folder for each generated template. The subfolder contains template properties that describe the page, the area, and available components. Read how to create a new page template.
ha --help#
Run this command to see all the commands HA CLI is providing.
Execute --help command with any ha command to see a short description.
ha login#
Run ha login if your Magnolia Nexus credentials need to be updated. Read more about updating the credentials.
ha self-update#
Run ha self-update to update the HA CLI to the latest version on Mac/Ubuntu. Read more about updating the HA CLI to the latest version.
HA CLI dev console#
The HA CLI dev console is displayed when running ha dev.
The top part of the dev console provides the output of the HA CLI tool.
The lower left side starts up the local Magnolia instance. It contains all log files from Magnolia.
The right side starts up the web app, for example the next.js application. For the project with Magnolia and SFCC integration, it starts up the Salesforce Composable Storefront.
Read more about using the ha dev command and evoking action in the dev console.
Starting a project without the HA CLI dev console#
If you prefer not to use the HA CLI dev console (ha dev), you can still start up your project and use HA CLI with the following steps:
In separate terminal windows:
- navigate to the .mgnljumpstart folder and run
npx --yes @magnolia/cli@4 startto start up Magnolia AdminCentral on port 8080 - navigate to the project root and run
yarn devto start up web app of the chosen framework port 3000 - navigate to the project root and run
ha install -wto use HA CLI features in the watcher mode
Build#
Example build of lightmodules in dist directory
OS X or Linux:
"mgnl:build": "HA_CLI_MGNL_LIGHT_MODULES=./dist ha install"Windows:
"mgnl:build": "set HA_CLI_MGNL_LIGHT_MODULES=./dist && ha install"note
You also want to overwrite HA_CLI_TARGET_SERVER and HA_CLI_MAGNOLIA_AUTHOR for production build using the proper urls.
Dev info#
From developer perspective HA generates component's javascript (or typescript) model and storybook args model, based on the yaml file definitions.
So when HA detects changes in the filesystem it iterates over yaml definition files in the source folder and for each yaml file:
- generates javascript (or typescript) component model (*.model.[js/ts]) file
- generates storybook args model (*.Args.[js/ts]) file
- updates componentMappings section in magnolia.config.js file
Storybook#
The HA CLI preconfigures all the headless projects to work with Storybook. Start the Storybook by typing s in the dev console or by execute yarn storybook in the project repository. HA CLI starts up the Storybook and opens the browser. See all the actual pages and components from the project in the Storybook.
You can read more about storybook integration on this link.
Environment variables#
There is a variety of HA CLI variables that can be modified in a .env file in the project root directory. The default values are:
| Argument | Value |
|---|---|
| HA_CLI_MGNL_HOME | .mgnljumpstart/apache-tomcat |
| HA_CLI_MGNL_LIGHT_MODULES | .mgnljumpstart/light-modules |
| HA_CLI_LIGHT_MODULE_NAME | Defaults to the project name in package.json |
| HA_CLI_TARGET_SERVER | http://localhost:3000 |
| HA_CLI_MAGNOLIA_AUTHOR | http://localhost:8080/magnoliaAuthor |
| HA_CLI_MGNL_START_COMMAND | npx --yes @magnolia/cli@4 start |
| HA_CLI_DEV_START_COMMAND | yarn dev |
You can easily modify them for your development or production if needed:
HA_CLI_MAGNOLIA_AUTHOR=http://localhost:8080info
When setting variables HA_CLI_MGNL_HOME and HA_CLI_MGNL_LIGHT_MODULES, always make sure the corresponding folders are added to the .haignore file.
Magnolia variables#
The magnolia variables are placed in our package.json file in the project root directory. With these variables you can change some default behaviour in our project.
SpaEditor#
Here we can configure which renderer we want to use. By default we are using the classic spa renderer. We can change that by overriding the type of the SpaEditor property from spa to siteSpa
    "magnolia": {        "spaEditor": {            "type": "siteSpa"        },
... }With the siteSpa renderer you can define a common templatePrototype. Anything you configure in the prototype is applied to all page templates. The prototype makes configuration efficient as you only need to do it once. For example, add an area to the prototype to make it available on all pages.
This file must be named Prototype.yaml and needs to be placed in the templates/pages/Prototype/ folder. If you want to change its current path, you can configure that by setting the path property.
    "magnolia": {        "spaEditor": {            "type": "siteSpa",            "path": "mgnl-config/Prototype"        },
... }For more information about renderers, please refer to the Templating section of the magnolia documentation.
multisite#
If we don't want to generate a multisite configuration, we can set the generateMultisite property to false.
    "magnolia": {        "generateMultisite": false
... }Content References#
With the generateReferences property set to false in our configuration, we can prevent generating of reference-resolvers.
    "magnolia": {        "generateReferences": false
... }Refer to the Content References section to read more about this.
Directory for Magnolia-related files#
generatedFiles property determines the location for the generated Magnolia-related files.
Note that if this property is changed after the jumpstart, previously generated Magnolia-related files have to be moved manually.
Generating theme#
The theme yaml file is generated by the HA CLI by default. Set the generateTheme variable to false to not generate the theme.
Update#
Update CLI to the latest version#
To update the HA CLI version to the latest, run ha self-update in the console.
info
To update the HA CLI on Windows, you must update it directly by running npm update -g @magnolia-dx/ha-cli.
Update the Magnolia Nexus credentials#
To update the Magnolia Nexus credentials, please follow these steps:
- delete the existing .npmrc file
- run
ha login, which will prompt you for the Nexus credentials and configure the new .npmrc file

Git ignoring files#
As explained above, when you jumpstart a new HA project, ha does a lot of things in background like: downloads apache tomcat, downloads magnolia war, installs magnolia, creates light module, configures magnolia, bootstraps frontend project, etc ...
In case you host this project on some git repository it's recommended to ignore some files.
We recommend ignoring all files that are located under .mgnljumpstart folder. This folder contains tomcat, magnolia and light modules installations.
Also, we recommend ignoring all auto generated files: magnolia.config.js, mapping.json, *.model.ts, *.model.js, *.Args.ts, *.Args.js. This files are auto generated (based on the yaml file definitions) so there is no need to attach them to git repo because this files will be generated on next run of ha install command.
note
This files should also be under .haignore in case you are using this file.
Component without a dialog definition#
A dialog definition is always created when generating a new component with HA.
To define a component without a dialog, it is necessary to remove the corresponding folder from .mgnljumpstart/light-modules/<project-name>/dialogs folder manually.
In that case, if the component yaml file doesn't contain any dialog-specific definitions, dialog won't be automatically created again.
If we don't want to define anything for the component (such as a title, etc), we need to add to the yaml file of the component:
form: noDialog: trueWhen this is set, the dialog definition won't be created, but the component will still be handled as a Magnolia component by Headless Accelerator.
Troubleshooting#
Cannot connect to Magnolia Author#
Quit HA CLI and run killall java.
Too many open files#
The embedded Derby database, which can be used instead of the H2 database, opens several file handles and may run over the maximum limit set by the system. This issue can occur on some Linux and OS X systems such as Macbook Air.
The solution is to increase the system-wide limit on the number of open files. The exact procedure varies from one OS to another (see Too many open files) .
Ubuntu Linux#
Find the current maximum number of open files per user in a single session:
ulimit -n
The number is 1024 by default, which is too small.Edit the limits.conf file:
sudo gedit /etc/security/limits.confAdd the following lines to the file:
* soft nofile 10000
* hard nofile 50000
This sets for all users a soft limit of 10000 open files and a hard limit of50000. These are just examples. Set the limit according to your needs. Note that the wildcard option applies only to regular users, not tosuperuser. If you run Magnolia assuperuser, replace the asterisk withroot.Save the file.
Edit the configuration file for session-related modules:
sudo gedit /etc/pam.d/common-sessionAdd the following line to the file:
session required pam_limits.so
On Ubuntu 17.04, you will probably also have to add the following line to/etc/systemd/system.confand/etc/systemd/user.conf: +DefaultLimitNOFILE=65535
See Cannot Increase open file limit past 4096 (Ubuntu).Save the file.
Restart Ubuntu.
Verify the new maximum number of open files:
ulimit -n
The command should now return10000.
OS X 10.8 (Mountain Lion)#
Find the current maximum number of open files per user in a single session:
ulimit -n
The number is 256 by default, which is too small.Add
ulimit -n 65536to your~/.profilefile. This increases the limit for the shell.Create a
/etc/sysctl.conffile if it does not exist.Add the following lines to
/etc/sysctl.conf:
kern.maxfiles=65536
kern.maxfilesperproc=65536
This increases the limit for the kernel.Open a terminal and type:
sudo sysctl -w kern.maxfiles=65536
sudo sysctl -w kern.maxfilesperproc=65536
sudo ulimit -n 65536
Or restart your system to read the settings from the files you edited.Type
ulimit -n. The response should be65536(if not, restart your system).Install Magnolia
For OS X 10.9 (Mavericks), 10.10 (Yosemite) and 10.11 (El Capitan), see Shell session limit.
For OS X 10.12 (Sierra) and 10.13 (High Sierra), see this thread.
note
The instructions above apply to Bash shell, not Zsh.